Tuesday, 4 September 2012

Reminders from Mother Nature

#DoItYOURSELF
#MakeACHANGE

Yes, it’s one of those times where you sweep your lazy bums off the sofa for watching too much, or sitting on the chair in front of a laptop, in a dim room, wondering what year it is. No, you get up. Stand up. Walk around the room. Walk out of the room. Greet your mother hello. Greet your sister hello. Greet your father hello. Get out of the house, knock at your neighbour’s house, greet them, share a smile, and don’t continue reading this post until you’ve done that. (Not wise if you’re reading this in the middle of the night.) I hope you learned something new from them.

Now that you’re all pumped up for the activity, or just the exact opposite, no matters! It won’t be a craft that requires a lot of technical skills. God bless.

And the dish(craft) you will be cooking(making) today is…

A terrarium necklace. I’m guessing that is a quite straightforward craft to do. “Just stick a plant and some soil into a little container and you’re good!” But it would be silly of me if I put it that way, even when that is the truth.

YOU WILL NEED:

  • A glass bottle charm


Honestly, I have no idea where you can get these bottles without buying them intentionally. When I was young, they were in the ‘trend’, and the people who sold these bottles decorate them prettily. And they put pink glittery things into it and make it sparkly. And you put little messages for yourself ten years later, and bury it in the garden……

  • A small plant and soil (that fits in a bottle)

Yuka comments “The plants that I’ve put in my necklaces so far have stayed small (mostly clovers and plants that don’t become huge), but yes, that’s totally possible if you use other plants!” I think having small plants is a nice idea, but what if you put a normal small plant in it, if it overgrows the bottle, replant it on solid ground, and place another small plant in the bottle? Excuse me for the sudden bold in words. That was a good idea for the environment, and I want people to take note of that.

  • Tweezers

Some things that I don’t really need to elaborate.

  • A chain or string for the necklace

Length depends. Making it a bracelet would be a bit annoying dangling around your arm. If you don’t like it as a necklace, there are always other options to be explored, like hanging somewhere on a hook where you see it every day.

  • Jump ring

Jewelry Clasps and Connectors

Don’t take it literally. It will not hop out of your sight.


METHODS:

  1. Stick the dirt and plant in the bottle. Or, stick the soil first, then use the tweezers and stick the plant in. (Don’t squish it!!!)
  2. Also, clean the inside of the glass because it won’t look like nice with dirt everywhere. “I cleaned mine with a chopstick wrapped with a little tissue around the end.” Quote by the author. Then, close the bottle.
  3. Attach a jump ring, and let the chain or string go around it.
  4. Lastly, water it every day! So this lovely plant will grow.


I actually love this idea of bringing a little plant around. When I first saw this post, I thought it’s simply brilliant for the workshop I’d be doing for a primary school, as part of the environmental group committee, and teach them about sustainability.

That little necklace is a constant reminder of the urgency of global warming, and the way they will water it every day, will become a habit to participate in events for the environment. I also interpreted it as a souvenir from Mother Earth, reminding, reminding, reminding that this is our Earth, and we’re to make a change here.


Also, shameless promotion of semi-related environmental programmes in Australia:

Youth Decide: The Energy Election is a national youth vote on renewable energy. In the next few months, the Federal Government will make a decision about how much of Australia’s future electricity will come from coal, gas, wind or sun. For one week in September, young people across Australia will come together in a national youth referendum. This is our opportunity to have our say on this critical issue.

From 10-17 September, join young people across the country holding voting events in their schools, universities, workplaces or communities. Put up your hand to help tens of thousands of young people be heard: register to hold your own voting event by filling in the form below.

(READ MORE: http://youthdecide.aycc.org.au/)

Because this is downright important business. And my group had only a week to organise this, and we need as many Australian youths to vote. I am aware that all my recent posts are environment related subjects, but… (resisting the temptation to use a witty response like #yolo)

      Please don’t forget about the environment.
                        Please don’t forget about her.

 Thank you, Clossette, for sharing us this craft! For the original article, here is the place. Picture credits in chronological order: x, x, x, x, x and x.

Saturday, 18 August 2012

A parrot went to the Olympics

Well, wasn't the Olympics wonderful. Everything went as we expected it would. Records were broken, medals were won, and the United States of America got the most gold medals. But it's now time for another Olympics. Olympics for birds. I've been training my friend Crackers up for all the events.


Of course, there are many events to compete in. Crackers seems to struggle a little with the 5 metre running race, often mistaking it for the "walking" or "turning around and going the wrong way" race.


Then there's the Flying race. Crackers is a little better at this, but still tends to fly the wrong way most of the time.


Finally, there's Crackers favourite event. It's called "Seedsearch." Seeds are scattered in various places on the ground, and the birds have to try and find as many as they can before the other birds get to them. Crackers has much fun training for this.


Olympics for parrots begins on August 29 and continues for 11 days, going by the name of Parrotolympics.

Actually...

It appears I may have misheard the name of these Olympics. Sorry Crackers, but it's not the Parrotolympics that starts soon. It's the Paralympics. There is no Olympic Games for parrots. I'm really sorry.

(Oh no...he's started crying. He really did want to go to London to compete. Poor bird.)

Even though I got things a bit muddled there, I'll be tuning into the Paralympics anyway. The Paralympics is a separate Olympic Games held shortly after each regular Olympics, with 21 sports. The key difference between the regular Olympics and the Paralympics is that the Paralympics is for athletes with a physical disability. This means that some amazing talent is showcased in some truly unique sports.

Like Wheelchair Tennis. Which is like tennis, but is played in a Wheelchair.
Source: http://www.london2012.com/paralympics
There are some slightly more regular sports such as Archery, Cycling, Athletics, Shooting, Rowing, and Swimming. But while the sports may be regular, the athletes are far beyond regular. Izhak Mamistvalov swum in the 2004 Athens Paralympics, and because of his cerebral palsy, can only use one arm when he swims. His other arm and his legs don't work, and simply hang there producing drag while he swims. Yet he broke two Paralympic records. Truly amazing.

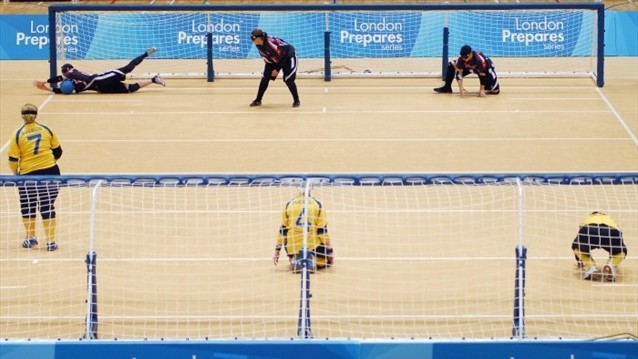
Whilst these normal sports are quite nice, it's the more unusual sports I find more interesting. Goalball's very interesting. It's for blind or visually impaired people (everyone wears a special mask to make them totally blind if they still have some partial sight). There's two teams. Each team has half a court, and has to throw a ball past the other team and into their goal. The ball has bells in it so they know where it is, and unlike many other sports, the crowd has to be completely silent while the game is played so the athletes can hear the bells ringing.


Source: http://www.london2012.com/paralympics
"Sitting Volleyball" is another interesting sport. It's fairly self-explanatory. It's volleyball, but rather than running around you sit down. If you're someone that's too lazy to do regular Physical Education at your school, you may wish to suggest this to your teacher...
Source: http://www.london2012.com/paralympics
Wheelchair Fencing initially appears quite interesting, but gets a little dull after a while, whilst Wheelchair Basketball is very good. But my favourite would have to be Wheelchair Rugby, the best Paralympic sport of all.

Yep, you read that right. Wheelchair Rugby.

Each team is allowed to put four players on the court at a time. Each athlete has a disability that affects their arms or legs, and is given a certain amount of "points" as to how severe their disability is. Each team can have a maximum of 8 "points" on the field at a time, to keep things fair (so a team can't just have four very mobile players). The idea is, just like regular rugby, a team has to carry the ball over their goal line. But, unlike regular rugby, each player is in a wheelchair. Players are allowed to crash their wheelchairs into other players, and try to grab the ball off them. It involves lots of falling over, and has been given the nickname "Murderball."

Source: http://www.london2012.com/paralympics
In the second image you can see my favourite player, Australia's Ryley Batt. He's possibly the best player in the whole competition, and Australia's strategy is always to simply pass the ball to him and hope he'll be able to ram his way through all the other players to score a goal. You can see the highlights from the 2008 Beijing final here, where the United States beat Australia to get the Gold Medal, whilst Australia won Silver.

Unlike the actual Olympics, there's a lot less Copyright and Broadcast rights around the Paralympics, which means that you can watch the games live on the official Paralympics Youtube channel here. (For readers in the Philippines, my research suggests that this is the only way to watch it, as it doesn't appear to be televised. In Australia, the ABC will be showing it live! Without annoying ad breaks in the middle of sports! Hooray for the ABC!)

Even though everybody is confident that the United States will win the most Gold medals, it's still worth having a look at. I personally follow it more actively than the regular Olympics. The only person not happy about it is Crackers, who is still imagining himself winning a Gold Medal at the Parrotolympics...

Sunday, 5 August 2012

Light ‘Bottle’


A Liter Of Light Video (Official Version)

‘A Liter Of Light’ is a project by Illac Diaz from Phillippines, aiming to let this simple craft spread across the world so that no one will suffer with lack of electricity. It’s a good and smart craft, so I thought I should share with my fellow PRs. As I believe, many authors and readers are from Phillippines, and some may experience this ‘no-light-in-the-house’ and if that’s the case, this is for them. And for anyone you readers know who suffers from that.

Otherwise, it might be useful someday in the future. For example, one day, you may be lost in the forest and found a little hut as shelter for the night. Throughout the cold, dark night, no light brighten up your night… But wait a minute, you remember something! You remember? The video you watched thirty years ago on how to make a light bulb with a water bottle…

Survival skills. Right, that’s the word. But I doubt that would be your top worry if you were ever lost.

For those people who can’t watch the video, let me recap how this is done.

  1. Get an empty water bottle. From the ground, after you finish one, from the bin (For hygienic reasons, this is optional.) This size can be enough, any smaller is okay too, as long as it fits (the top bit seen from the roof, and the bottom bit seen under), size doesn’t matter.
  2. Punch a hole on a piece of metal roofing. Be sure the hole must be big enough for the bottle to slide it in.
  3. Slip the bottle in and apply some sealant around the bottle that intersects the metal. (Brought to you by dictionary.com) sealant (noun) A substance used for sealing, as sealing ex or adhesives. After you do that, you might need to wait for them to dry for them to stick.
  4. Fill the bottle with filtered water, add some bleach and close the lid.
  5. Install it on the roof. I’m not sure how to explain it, for I did not do it myself, but here and here’s a screenshot for how they do it.
  6.  Make sure it’s sealed. So the roof won’t leak.

Then it’s done. Simple as that!

FRIENDLY REMINDER: The craft only works on metal ceilings, or other materials similar to that. But I would love to see you try punching a hole against a brick ceiling and install a water bottle there. If that’s the case, ‘It’s for the environment!’ is not a valid excuse for that.