Showing posts with label how to's. Show all posts

Wednesday, 11 July 2012

A Grim Grimm Grins when Snow is White


The year is 1811, and Jacob Grimm has an idea for a story. Various elements flow through his head. An evil queen, who wants to be the fairest one of all. A princess, who happens to be the fairest one of all. A magic mirror, that can not only talk, but is also a fashion expert, and is able to judge exactly who's the fairest one of all. An excellent idea for an excellent story. The only problem is, Jacob really cannot get himself motivated to write.


Letting your creative juices flow by writing your own story can be a lot of fun. Keeping yourself motivated when writing however, whether it be a short story or a novel, can be difficult. Especially if you’re writing a novel. So how can you do it? Fortunately, there are two very easy ways to motivate yourself. If you know anything about how Jacob Grimm wrote, you should be able to work out the first one quite easily.


Jacob Grimm had a brother, Wilhelm Grimm. His brother was also an aspiring writer, but also suffered from motivational problems. And as he could not afford a psychologist to tell him how best to get himself to continue to write, he got his brother to help. And of course, his brother realised in an instant the best way for someone to motivate themselves to write.


1. Write with someone else. It’s simple. Find somebody who you get on well with, whether it be a face-to-face friend or an online friend, think up a good idea, and start writing. Try doing it online; Google Docs, for example, is a free way to allow you to both work on a story together. Perhaps you could plan out the story to start out with, and alternate paragraph by paragraph/chapter by chapter. Or perhaps you could take it in turns to write chapters, with not much idea where the story is going at all. Either way, with another person working with you, you’ll feel much more motivated to keep writing. I call it “Collaborative Fiction”. A grand idea deserves a grand name, after all.


Unfortunately, it would be another 200 years before Google Docs came, which made Jacob and Wilhelm’s job rather more difficult. The only internet they could get their hands on was tying two paper cups together with a long piece of string, and talking through it. As this was a rather inefficient way of writing a story, they decided to sit there face to face, (...Freaky! Face to face!...) typing on a keyboard known as “the quill”, and motivating each other as they went. As a result, not only did they stop procrastinating but they were able to choose the best ideas out of their separate heads. This meant that Jacob’s brilliant idea to have Dwarfs was included, and his rather silly idea to have the queen turning into a dragon was laughed at by Wilhelm, and was dumped into the trash can. (A real, physical trash can. To Wilhelm's disgust, there wasn't any pixel trash can yet on his non-existent computer.) It also meant that Wilhelm’s idea of a poisoned apple was kept, but his dangerous idea of having a detailed description of how the apple was infused with rhubarb leaves to make it poisonous was excluded. “After all,” reasoned Jacob, “we don’t want to be sued for teaching rubbish children how to poison their nasty old rubbish step-mums.”

2. Write with a whole group of people. Okay, this second Collaborative Fiction idea won’t be getting you any literature prizes. But it’s probably the most enjoyable way to write. Basically, a whole bunch of people get together, and take it in turns to write a paragraph. Nobody has any idea where the story is going, making it very unpredictable, and meaning it’ll have lots of twists. There are all sorts of versions; it can be done online, or perhaps in person, where a bunch of people pass around a sheet of paper and add to it. Another variation that you may have done at school is where a class sits around and each person speaks out a couple of sentences, and other people have to continue the story. The result of this is often very confusing, and very amusing.

“I have a wonderful idea!” announced Wilhelm without warning, causing Jacob to spill his tea all over his desk.
“What rubbish is it this time?” grumbled Jacob, trying to mop up the tea before it reached the Snow White Word Document (which was really just an old fashioned thing known as a piece of paper).
“Well, you see how much better we’re writing with two of us working together?” asked Wilhelm.
“Rubbish,” replied Jacob. “If it weren’t for rubbishy-old-you I would have had Snow White cutting herself rubbishly out of a dragon by rubbish now.”
“If it weren’t for me you wouldn’t have written one line,” retorted Wilhelm. “So why don’t we expand on this way of writing? Why not get more of our friends in here, and we can all work on our story together!”
“Rubbish idea,” wheezed Jacob. “That’d mean I’d have to share the rubbish profits with a whole rubbish group of people. As it happens I really don’t think you deserve your rubbish share, what with silly rubbish like rhubarb leaves. Rubbish!”

If you're doubtful about whether writing collaboratively can actually work, then I'm happy to remind you that Pencil Rubbings is a good example of it! This very blog thrives because of the way its multiple author setup works. If Pencil Rubbings only had one author, I'd be quite confident in saying that it would likely have crawled to a halt months ago. The additional enthusiasm of a number of people has kept it going strong.


This post wouldn’t be complete without an example of a Collaborative Fiction story. So, here’s the Pencil Rubbings Collaborative Story. I’ll start it off in the comments section below. Then, anyone that wants to can contribute by writing the next paragraph, or at least the next sentence or two. Nothing inappropriate, or your contribution will be deleted! To keep the story flowing nicely down the page it would be best if you only comment if you’re continuing our story. So take the plunge, and add a twist by writing at least a sentence or two!
(And by the way, all the italics in this post are, to quote Jacob Grimm, “rubbish.” I made it up. The Brothers Grimm didn’t actually write their fairy tales, they compiled them. So someone else wrote Snow White. Probably without collaboration. But you never know…)
Here it is then.


Maria and the Green Wizard


Thursday, 5 July 2012

Poaching

Poaching: The act of illegally hunting or catching (game or fish) on land that is not one's own or is under official protection.

I love poaching. It’s an art that requires much skill. People have poached for hundreds of years, and there’s no danger in it dying out. The end result is so tasty! I happen to know a poaching secret or two, and so I’m now going to reveal exclusively to readers of Pencil Rubbings my guide to poaching. No, I’m not referring to illegally sneaking onto someone else’s property shooting their pet deer, and dragging it home for dinner. I’m referring to a different type of poaching.


Poaching: Cooking an egg without its shell in or over boiling water.


Eggs can be healthy, if eaten in relative moderation and if cooked in a healthy way. Poaching is one of these ways. The problem with poaching however is how complicated it is. Poaching an egg the traditional way involves putting water and vinegar into a saucepan, boiling it, stirring the water to make a whirlpool, putting in the shell-less egg (if you’re lucky it won’t completely disintegrate into the water), cooking it for a few minutes, and taking it out. Quite a time consuming breakfast that leaves you with heaps of washing up to do afterwards. And so my grandmother, fed up with all this bother just to get herself a delicious and healthy egg for breakfast, decided to experiment with cooking eggs in the newly-invented microwave she'd just bought herself. Of course, this was before all the fuss about what you can and can’t put in a microwave, so I’m sure she may indeed have begun her experimentation by putting a whole egg, in its shell, into the microwave.

(Don’t do that, by the way. Let’s just say you end up with a very sticky situation. And perhaps in need of a new microwave. If you don't believe me, watch some of the YouTube videos.)


So with a little more experimenting, she discovered how to poach an egg in the microwave, with minimal dishes, time, effort, and explosions. She then eventually told my mother, and my mother eventually told me. Now I’m sharing this closely guarded secret that has been passed down the generations with the Pencil Rubbings community! Although I somehow think that it’s more likely that my “closely guarded secret” was similarly discovered by many other people a long time ago, and is already all over the microwave-possessing part of the world anyway. I really have no idea. Anyway, here it is. How to poach an egg in the microwave. Obviously this only works if you have a microwave oven. I really don't know how common microwaves are outside my own country, so if you have no idea what I’m talking about, then disregard this recipe.


You’ll need:
-An egg (No need to leave it out of the fridge before-hand. Not like when you’re making cakes.)
-A microwave (No need to leave it out of the fridge before-hand either. Assuming you store your microwave in the refrigerator.)
-Bread (Assuming you wish to eat toast with your egg.)
-Toaster (Assuming you want your toast to be toasted, as opposed to raw.)
-Glad-wrap (also known as cling-wrap. The plasticky stuff that people use to wrap things. Like sandwiches, not presents. You know, this sort of thing:
)

-A knife and fork (Not the Murder-Weapon-Knife, or even the Kitchen-Chopping-Things-Knife. Just an ordinary Spreading-Butter-Knife will do.)
-A plate (Unless you want to save on washing up by eating off the bench. But I would not recommend this; very unhygienic.)
-A microwavable cup. (Do check that it’s microwavable. Best results will be if the base is round and about the same size as what a regular poached egg is. Something like this:
)

-Salt and pepper (Depending on taste, or how healthy you want to be.)
-Margarine/butter/table-spread/any other yellow or white stuff you spread on toast
-An adult’s supervision (It’s obligatory, I know.)

The rest is easy.
1. Put a slice of bread in the toaster. You may need to get the afore-mentioned adult to help you cut it if it hasn’t been cut yet.
2. Crack the egg into the cup. Make sure there’s no shell in the egg, you don’t want a crunchy poached egg.
3. Use the fork to prick the yolk. You’re not trying to mix it in, all that’s needed is a quick prick. There shouldn’t be any difference to the naked eye, but this will help prevent the yolk from...gulp...exploding.
4. Cover the top of the cup with the cling-wrap.
5. Possibly the most important step: use that ever handy fork to prick holes in the glad wrap. Probably about three good pokes around the centre of the glad-wrap (but only little holes, don't let them join up to make big holes).


Nope, I haven't put two eggs in (although you can do that if you want). I somehow managed to get a double-yolker egg when I took that photo (that's an egg with two yolks in it if you didn't know).
6. Start the toaster. (The idea here is to try and sync things up so the toast finishes cooking at the same time as the egg does; but this’ll really depend on your toaster and microwave.)
7. Put the cup with the egg in it into the microwave, and cook it for 10 seconds on High (which should be the default setting anyway).
8. This is where things get a little challenging. You want the egg white to cook through, but ideally you want the yolk to still be a little bit runny. After 10 seconds, take the cup out, inspect, and give it a little swirl to make sure it’s cooking evenly. It’ll probably need a little longer. So, put it in for another 10 seconds or so, and continue this procedure until the white looks mostly solid.


9. If you hear a “bang,” there are two things you need to do.
    (a.)  Don’t panic. There’s nothing the matter. All that’s happened is the yolk has exploded. That’s why you put the cling wrap on top of the cup. It just means that your egg won’t quite be cooked as it should, with the yolk a little too crumbly, instead of runny. It’s still definitely edible, and quite tasty. Just blame your adult supervisor for it not being perfect. And stop it earlier next time.
    (b.)  Stop the microwave straight away, and take out the egg.
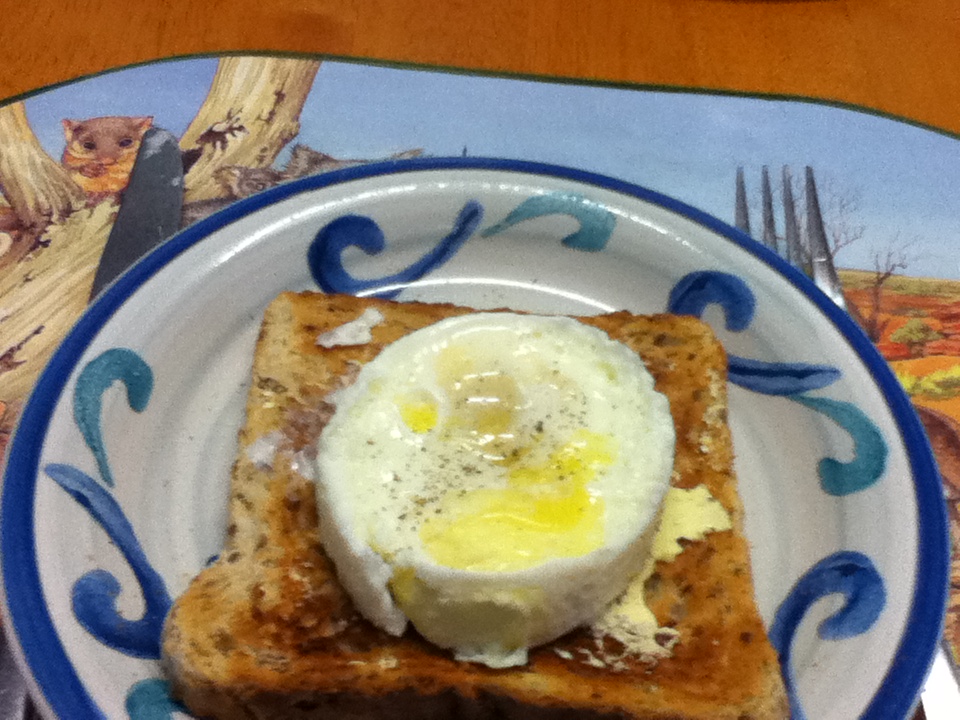
10. Use the knife to spread the spready stuff onto the toast once it’s cooked, and then use the knife to go round the egg in the cup so it tips out easily onto your toast. Put salt and pepper over the egg if you wish, and then enjoy eating your egg with that ever useful knife and fork.


Wow. That seems rather complicated. It isn’t. Getting the egg cooked just right may take a few attempts, but it’s certainly easier than the traditional poaching method. And there’s far less dishes as well. Just a plate, a cup, a knife, and a fork. Try it. At the very least you’ll be able to tell your friends about how you’re now officially a poacher.

Friday, 29 June 2012

The 7 steps to being liked by absolutely everyone

Don’t you find it annoying that there are people out there who just seem to dislike you? Do you make enemies easily? Well then why not try these steps that will allow you to be liked by everyone?


1. Decide to change. If your current behaviours and actions are making you enemies, then there’s a good chance that if you continue as you are doing, you’ll continue to make enemies in the future. So you’ve got to decide to change your behaviour before anything will work. It’s very similar to learning to tie your shoes properly. You can continue to let your parents tie your shoes, and wish that you didn’t have to rely on them whenever you wanted to go outside. But nothing would change unless you learnt how to tie them yourself. And that would only happen if you decided you wanted to learn.

2. Tune your behaviour to the people you’re around. This takes skill and practice, but with a bit of effort, it is possible. So for example, if you happen to find yourself around a group of dedicated, hardworking students, then pretend to be a dedicated, hardworking student yourself. If you happen to be around a group of lazier, fun-loving people that would usually call hardworking students all sorts of dreadful names simply for being hardworking students, then pretend to be the same when you’re around them. The key is to develop 5 or 6 different personalities and be prepared to instantly switch between them at a moments notice. Very similar to switching channels on the television. (Although if you find yourself flicking through channels on the TV looking for something to watch; perhaps you’re better off going outside for a walk. Which means, if you were silly enough to refuse to learn yourself, you have to get your parents to tie your shoes for you.)

3. Don’t make enemies. It’s generally your fault for making an enemy out of someone only when you want this to be the case. So if you don’t try, it’ll probably be the other person’s fault whenever it appears that you and somebody else really aren’t seeming to get along. In which case, as soon as you notice that this is happening, the key is to immediately take steps to rectify the situation. Try and be extra nice to them. Hopefully, they’ll soon stop trying to be your enemy. For example, if your parents are starting to get annoyed at you because they always have to tie your shoes, as soon as you notice them getting cross with you about it immediately begin learning to tie your shoes yourself. That should prevent you from making an enemy out of your parents. (And for most people having an enemy as a parent is not a very nice thing at all.)

4. Be polite. Always. There are some people that think that good manners are very important. There are other people that think that good manners aren't so significant. If you’re not polite around these people, they probably won’t care. But if you’re not polite around the people that think that politeness is important, then they might get upset with you. On the other hand, if you are polite, then those that think politeness is important will likely respect you more, whereas those who are not polite won’t see this as a downside to you. Curious, isn’t it. In other words, if you remember your manners, you’re potentially doubling the people that may respect you. Like your parents, for example. If you’re stubborn enough to refuse to learn how to tie your shoes yourself, then your parents are far more likely to continue to respect you if you remember your manners whenever you ask them to tie your shoes.

5. Don’t swear. Never. The politeness rule applies with swearing as well. Whilst if you do swear there will be a group of people that will look down on you for doing so, if you don’t swear it’s not likely that anybody will find fault in you. And swearing at your parents when they offer to teach you how to tie your shoelaces won’t help anyone or change anything.

6. Spontaneous acts of kindness. Simply trying hard to not upset someone often isn’t enough to make them like you. Many people will only like others if they feel they have a reason to. And this may only be because the other person has done something nice to them. So try to do something nice for as many people as you can. Whether it’s something small like holding a door open for them, or whether it’s something bigger like offering to look after their pets while they’re overseas. But you should be concentrating most on the smaller things, because there’s a lot of people around. So offering to wash the dishes for your parents is a great idea to help them to continue to like you, even if you have to bother them to tie your shoelaces whenever you decide to go outside.

7. Realise that it’s impossible to be liked by everyone.And for those of you that really can’t be bothered learning to tie your shoelaces, you’re aged above 6, and your parents are going crazy, consider getting pull-on boots.

Thursday, 31 May 2012

Summer's Out; School's In!

Hi. This is Ica. I wasn't able to introduce myself before; but I was the one who reviewed the Avengers, Legend of Korra and Sherlock. (Visit my personal blog here.) Okay, anyway, I'm not here to review any T.V. series or move or whatnot; I'm here to help you kids to get ready for school.

Here in the Philippines, school's right around the corner (mine starts on June 7), and I'm doing my best to prepare for third year.While doing my end of summer routine, I realized that I should share some of my tips and tricks with you. I'll be telling you several important things you should do before the start of your school.

1) Clean your study area- Right. We all need one (a study area), where you'll be reading notes or doing homework. This place must be the most peaceful and serene place in your house; and the place must be nice and tidy. Over the summer, my study area became a place where I'd throw all my old books, notebooks and other pieces of scratch paper. Yesterday, I went over the things and decided on the things that I wanted to keep, sell or throw out. My table is relatively neat right now; and I think it's ready for school.

2) Buy a planner-Or at least a notebook where you can write down all the projects and homework you have for the day. You can't rely on memory alone when you're in school. Try getting one with a very colorful and vibrant design; that'll surely wake you up after a long day of answering what x is equal to, and what started the Cold War.

3) Skim through your books- I mean, honestly, don't take this the wrong way but you have to at least read the few pages of your books. You need to prepare yourself for what's to come this school year; mind you, it'll be much harder than the year before, this will be a good way to prepare for school. If you're really up for it, you might even try taking down some advanced notes.

So, there you have it. Three tips on how to get ready for school. Hope you found these very helpful! Good luck to all those whose school is about to start. You're going to need it.

Tuesday, 29 May 2012

Room Makeovers

Do you hate how your room looks? I do. Mine is cluttered with toys that I haven't gave away yet, coloring books, Barbie dolls, old clothes and a lot more! If you were to give your room a makeover, how would you do it?

Start with your old stuff, like what I mentioned above. Donate them to the unfortunate kids out there or have a garage sale! You could even keep some of your stuffed toys or your action figures, build a shelf and put them on top in a line. To fill the empty spaces of your old stuff, you could place all the stuff in your room that makes it cluttered on it, like the stuff that you just leave lying on the floor.
Now that your old stuff are out of the way, what should you do with your books? Or your movies? Or your CDs? You could build a shelf (you just need a plank of wood, those frames to keep it up and a few nails, but even if it sounds easy to buy and make, I don't guarantee it would be cheap. Usually is) and stack them there. Arrange them by kind, author, color, alphabetically, height, width, or just stack them there in no particular order! You could also place these stuff where your old stuff were, like what I mentioned earlier.
We should start with your desk next (if you have one). It's always important to keep your desk clean so that you could study there (studying in your bed makes it messy, and when you're done doing your homework, you're probably too lazy to pack them up so you just shove it all to the floor). If you study on your desk, you tend to study more neatly and properly (if you don't, try) and if you're done doing your homework and you're too lazy to pack up, just leave it there and pack it the next day. But you should at least make an effort to clean up.
And my favorite part of room makeovers is...badum tss your wall. Bring out all your Tigerbeat magazines, pull out the posters and stick them to your wall! Haha. Here is how my wall looks like (maybe you could get some ideas, hmmm?):


I love shopping, and whenever I snip off all those price tags from my clothes, I keep the brand tags and tape them to my wall. It mostly consists of Forever 21, Candie's and Artwork.


These are all some (I repeat: some) of my posters in my room. The picture in the middle of my door is a picture of Mikee and I when we graduated from photography classes.


The mainstream thing now on walls are usually quotes and song lyrics, but I placed a Bible quote. (I didn't cut out all of the letters individually because I was too lazy) I placed some of my pictures of me and my friends under it.
"Sorrow is better than laughter because when the face is sad, the heart grows wiser." -Ecclesiastes 7:3

I hope these helped in making your future room! :-)

Tuesday, 8 May 2012

Happy Birthday, Katniss Everdeen!: Katniss' hair in the reaping

(c) hungergamesanonymousaddiction
on Tumblr
Today, one of the victors of 74th Hunger Games is celebrating her birthday! Katniss Everdeen, the girl who was on fireeeeeeee! -clap clap applaud applaud kiss your three fingers on your left hand and hold it up to her-

It's her birthday, so I'm gonna make another Katniss hair tutorial! Yay. Today, I will teach you how to make Katniss' braid in the reaping.

Sadly, I'm in a bit of a hurry now and I don't have time for any illustrations (except for the GIF over there, which was hard to find).

You're going to need some bobpins and hair ties (preferably the transparent or the ones that match your hair color).


  1. French braid your hair on both sides of your head, a bit close to your ear. (If you don't know how to french braid, google it or read my tutorial on how to do Katniss' hair in the Games [if you decide to read my post on how to do Katniss' hair, remember to braid your hair over instead of under]).
  2. After braiding both sides of your head, fold them over each other. Clip bobpins so that it will stay in place. You could also place hairspray if you want.
I'm sorry for this hasty post and the not-so-clear instructions! But if you still don't get it, this is where I learned it:


Sunday, 6 May 2012

Summer treat!

Summer's round and about and what do we mostly get from it? Boredom and heat!  So here's for those who find themselves wandering in their fridge every five minutes. May I present... tununuh: Homemade Ice Cream!


Milk's probably the main ingredient for your favorite cold dessert and with a pint of that, you're capable of making your ice cream with no machine needed. ;)
There are a few other ingredients too, of course but they're just probably stored in your pantries or found at the baking aisle of your supermarket, convenient store and drugstore. 


Okay, so here's what you'll be needing:

  • 1 tablespoon sugar 
  • 1/2 cup milk or half & half (Not technically Half & Half so your ordinary t-pack of milk'll do.)
  • 1/4 teaspoon vanilla 
  • 6 tablespoons rock salt
  • 1 pint-size plastic food storage bag (e.g., Ziploc) 
  • 1 gallon-size plastic food storage bag
  • Ice cubes
After gathering those, you'll have to follow these five easy steps with, as most prefer, a guardian for safety.

  1. Fill the large bag half full of ice, and add the rock salt and then seal the bag.
  2. Put milk, vanilla, and sugar into the small bag, and seal it..
  3. Place the small bag inside the large one, and seal it again carefully. (Tip!: Make sure the small bag is sealed tightly so that the salt won't be ending up the flavor of your ice cream!)
  4. Shake until the mixture is ice cream, which takes about 5 minutes.
  5. Wipe off the top of the small bag, then open it carefully. Enjoy!
Aaaaaand, there you have it! Homemade ice cream done in less than ten minutes!


(c/o: Kaboose)


Sunday, 22 April 2012

Inspire yourself


THXTHXTHX (A Thank You Note A Day)
Hello, I’m Germaine (aka WearingGnome from Lost In Sunshine;) and I am a brand new contributor of Pencil Rubbings. Today, I want to share tips of creating a journal that inspires you.

Do you have a day you feel awfully miserable and nothing seems like it went your way? Do you have a day when you feel hopeless and maybe even, attempt to suicide? No more, dear. No more. Make your inspirational journal today and all your worries will just walk away! (I sound like an advertisement, but I encourage everyone to do this.)

So what is an ‘Inspirational Journal’ anyway? It’s a journal where you keep track of your happiness and wonderful moments that occurred to you, so when you are older(or not very old) you look back and feel the joy splashing at your face all over again. And I hope, you'd look at it when you are sad, and from there, smile again.

Here are some tips I recommend to make your inspirational journal:

1.         Get a book. A premade notebook, a notebook you made yourself doesn’t matter.
2.         Decorate your journal. Flowers, ribbons, stickers, whatever! As long as it makes you smile and you could write comfortable on it, go ahead!
3.         Write in detail interesting moments of your life. You know those ‘lol’s you saw on the Internet? Remember those hilarious moments you and your friends made? Oh perhaps your crush asked you for an eraser?  Write them down! And quick too, in case the memory and why you laughed upon it has gone away over time.
4.         Attach other sources on it. When I say other source, I mean photos, quotes, items that reminds you about that certain event. Like a scrapbook! To support how hilarious those moments are.
5.         Date your notes. I always date my notes. I think it’s important to know when you’ve written it tells you when did it happened, and how long has it passed.
6.         Negative events are a big no-no. When you look back, you sure do not want to remember those embarrassing moments that occurred to you, do you? But if your embarrassment are within a laugh, sure, put it down!
7.         Update regularly. This may be the most important and the point most people ignore at all times. Many people has abandoned journals because they never update. And then they forget. Always take a day in the week to write something funny in it, but the more days you update, the better!

When I started my journal, my friend asked me why don’t I do it online? And I told her as simple as, It won’t be as interesting. Don’t anyone think looking at your handwriting defines the mood you are at during those moments? I feel like that too. And that’s why I choose to write my journals on paper than the Internet. I hope you feel the same way too.

See you next time!

Clove's Training Hair


Clove's hair
Front
If you want to 'fancy up' your hairstyle in PE class and if you're also a fan of The Hunger Games, then Clove's ponytail is for you! It's easy. It's basically some sort of hair that a Japanese warrior would wear. You're going to need five/six (elastic) hair bands (preferably the color of your hair).


  1. On each side of your head (above your ear), make two small pony tails; one on top and one at the bottom. (If you're having a hard time tying, then tie the top ponytail first then clip it to the back of your head then do the bottom ponytail. Unclip when you're done.)
  2. From the back of your head, divide your hair into two parts; one on top and one at the bottom. Tie the strands on top (the one on the side of your head) to the top hair and tie the strands at the bottom to the bottom hair.
  3. If you find tying your hair in two ponytails in the back hard, then you can just tie all of your hair into one ponytail.

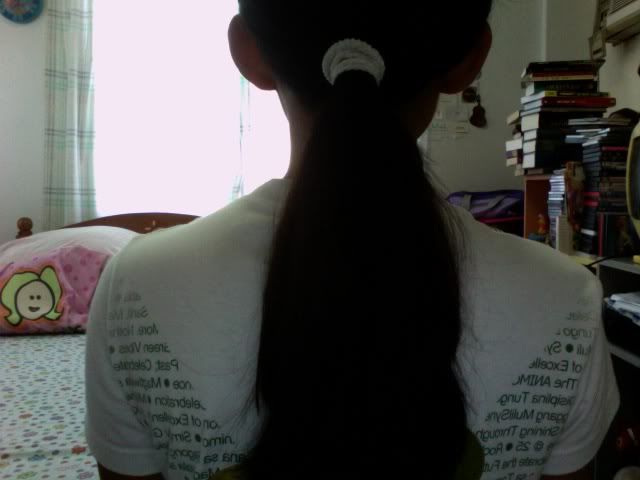
Back-easy

There you have it! Clove's ponytail. Easy, right?
If you want to learn how to do Katniss' braid in training/games, click here!

Saturday, 21 April 2012

Katniss Everdeen's Braid

Katniss' braid
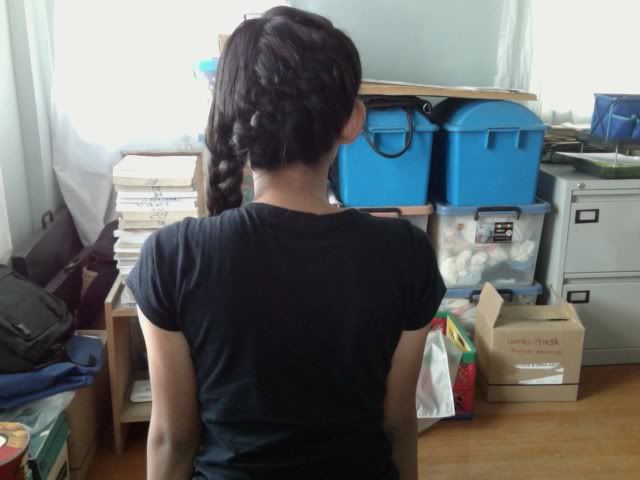
I know that most girls are dying to learn Katniss' braid from The Hunger Games. It's basically a dutch braid or the opposite of a french braid. It starts from the upper right part of your head and runs down diagonally to the lower left of your head.

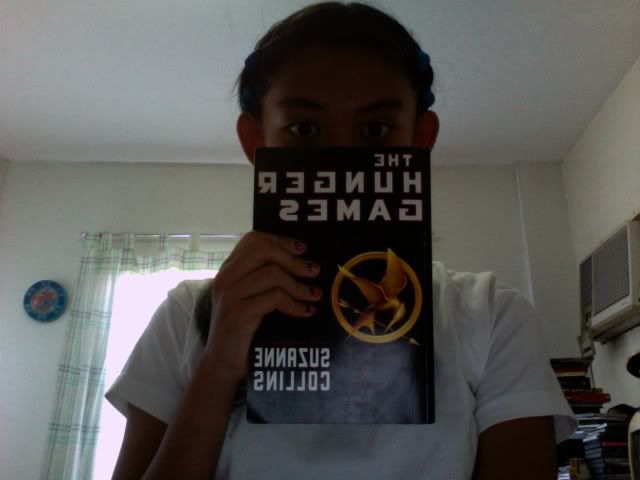
My Katniss braid (my camera is a mirror)
For those who know how to do a french braid but not a dutch braid, it's simple. Just do the steps of a french braid but instead, braid it under. For example, if you cross your three hair strands over each other, you have to cross them under each other.


  1. Get a section of hair from the upper right part of your head and divide it into three strands, just like a normal braid.
  2. Take the left strand and cross it under the middle strand.
  3. Take the right stand and cross it under the middle strand.
  4. Add a section of hair to the right strand then cross it under the middle strand.
  5. Add a section of hair to the left strand then cross it under the middle strand.
  6. Repeat the adding of hair and crossing under until it reaches the end of your head.
  7. When your done braiding on your head and reached the end of your head, braid it normally over your right shoulder (remember, cross under).
There you go! It's not easy, right? But guess what; just keep practicing and practicing until you get it right. If you do it by yourself (like me), your arms will ache, but it worth it/the try.