Showing posts with label summer ideas. Show all posts

Wednesday, 11 July 2012

A Grim Grimm Grins when Snow is White


The year is 1811, and Jacob Grimm has an idea for a story. Various elements flow through his head. An evil queen, who wants to be the fairest one of all. A princess, who happens to be the fairest one of all. A magic mirror, that can not only talk, but is also a fashion expert, and is able to judge exactly who's the fairest one of all. An excellent idea for an excellent story. The only problem is, Jacob really cannot get himself motivated to write.


Letting your creative juices flow by writing your own story can be a lot of fun. Keeping yourself motivated when writing however, whether it be a short story or a novel, can be difficult. Especially if you’re writing a novel. So how can you do it? Fortunately, there are two very easy ways to motivate yourself. If you know anything about how Jacob Grimm wrote, you should be able to work out the first one quite easily.


Jacob Grimm had a brother, Wilhelm Grimm. His brother was also an aspiring writer, but also suffered from motivational problems. And as he could not afford a psychologist to tell him how best to get himself to continue to write, he got his brother to help. And of course, his brother realised in an instant the best way for someone to motivate themselves to write.


1. Write with someone else. It’s simple. Find somebody who you get on well with, whether it be a face-to-face friend or an online friend, think up a good idea, and start writing. Try doing it online; Google Docs, for example, is a free way to allow you to both work on a story together. Perhaps you could plan out the story to start out with, and alternate paragraph by paragraph/chapter by chapter. Or perhaps you could take it in turns to write chapters, with not much idea where the story is going at all. Either way, with another person working with you, you’ll feel much more motivated to keep writing. I call it “Collaborative Fiction”. A grand idea deserves a grand name, after all.


Unfortunately, it would be another 200 years before Google Docs came, which made Jacob and Wilhelm’s job rather more difficult. The only internet they could get their hands on was tying two paper cups together with a long piece of string, and talking through it. As this was a rather inefficient way of writing a story, they decided to sit there face to face, (...Freaky! Face to face!...) typing on a keyboard known as “the quill”, and motivating each other as they went. As a result, not only did they stop procrastinating but they were able to choose the best ideas out of their separate heads. This meant that Jacob’s brilliant idea to have Dwarfs was included, and his rather silly idea to have the queen turning into a dragon was laughed at by Wilhelm, and was dumped into the trash can. (A real, physical trash can. To Wilhelm's disgust, there wasn't any pixel trash can yet on his non-existent computer.) It also meant that Wilhelm’s idea of a poisoned apple was kept, but his dangerous idea of having a detailed description of how the apple was infused with rhubarb leaves to make it poisonous was excluded. “After all,” reasoned Jacob, “we don’t want to be sued for teaching rubbish children how to poison their nasty old rubbish step-mums.”

2. Write with a whole group of people. Okay, this second Collaborative Fiction idea won’t be getting you any literature prizes. But it’s probably the most enjoyable way to write. Basically, a whole bunch of people get together, and take it in turns to write a paragraph. Nobody has any idea where the story is going, making it very unpredictable, and meaning it’ll have lots of twists. There are all sorts of versions; it can be done online, or perhaps in person, where a bunch of people pass around a sheet of paper and add to it. Another variation that you may have done at school is where a class sits around and each person speaks out a couple of sentences, and other people have to continue the story. The result of this is often very confusing, and very amusing.

“I have a wonderful idea!” announced Wilhelm without warning, causing Jacob to spill his tea all over his desk.
“What rubbish is it this time?” grumbled Jacob, trying to mop up the tea before it reached the Snow White Word Document (which was really just an old fashioned thing known as a piece of paper).
“Well, you see how much better we’re writing with two of us working together?” asked Wilhelm.
“Rubbish,” replied Jacob. “If it weren’t for rubbishy-old-you I would have had Snow White cutting herself rubbishly out of a dragon by rubbish now.”
“If it weren’t for me you wouldn’t have written one line,” retorted Wilhelm. “So why don’t we expand on this way of writing? Why not get more of our friends in here, and we can all work on our story together!”
“Rubbish idea,” wheezed Jacob. “That’d mean I’d have to share the rubbish profits with a whole rubbish group of people. As it happens I really don’t think you deserve your rubbish share, what with silly rubbish like rhubarb leaves. Rubbish!”

If you're doubtful about whether writing collaboratively can actually work, then I'm happy to remind you that Pencil Rubbings is a good example of it! This very blog thrives because of the way its multiple author setup works. If Pencil Rubbings only had one author, I'd be quite confident in saying that it would likely have crawled to a halt months ago. The additional enthusiasm of a number of people has kept it going strong.


This post wouldn’t be complete without an example of a Collaborative Fiction story. So, here’s the Pencil Rubbings Collaborative Story. I’ll start it off in the comments section below. Then, anyone that wants to can contribute by writing the next paragraph, or at least the next sentence or two. Nothing inappropriate, or your contribution will be deleted! To keep the story flowing nicely down the page it would be best if you only comment if you’re continuing our story. So take the plunge, and add a twist by writing at least a sentence or two!
(And by the way, all the italics in this post are, to quote Jacob Grimm, “rubbish.” I made it up. The Brothers Grimm didn’t actually write their fairy tales, they compiled them. So someone else wrote Snow White. Probably without collaboration. But you never know…)
Here it is then.


Maria and the Green Wizard


Thursday, 5 July 2012

Poaching

Poaching: The act of illegally hunting or catching (game or fish) on land that is not one's own or is under official protection.

I love poaching. It’s an art that requires much skill. People have poached for hundreds of years, and there’s no danger in it dying out. The end result is so tasty! I happen to know a poaching secret or two, and so I’m now going to reveal exclusively to readers of Pencil Rubbings my guide to poaching. No, I’m not referring to illegally sneaking onto someone else’s property shooting their pet deer, and dragging it home for dinner. I’m referring to a different type of poaching.


Poaching: Cooking an egg without its shell in or over boiling water.


Eggs can be healthy, if eaten in relative moderation and if cooked in a healthy way. Poaching is one of these ways. The problem with poaching however is how complicated it is. Poaching an egg the traditional way involves putting water and vinegar into a saucepan, boiling it, stirring the water to make a whirlpool, putting in the shell-less egg (if you’re lucky it won’t completely disintegrate into the water), cooking it for a few minutes, and taking it out. Quite a time consuming breakfast that leaves you with heaps of washing up to do afterwards. And so my grandmother, fed up with all this bother just to get herself a delicious and healthy egg for breakfast, decided to experiment with cooking eggs in the newly-invented microwave she'd just bought herself. Of course, this was before all the fuss about what you can and can’t put in a microwave, so I’m sure she may indeed have begun her experimentation by putting a whole egg, in its shell, into the microwave.

(Don’t do that, by the way. Let’s just say you end up with a very sticky situation. And perhaps in need of a new microwave. If you don't believe me, watch some of the YouTube videos.)


So with a little more experimenting, she discovered how to poach an egg in the microwave, with minimal dishes, time, effort, and explosions. She then eventually told my mother, and my mother eventually told me. Now I’m sharing this closely guarded secret that has been passed down the generations with the Pencil Rubbings community! Although I somehow think that it’s more likely that my “closely guarded secret” was similarly discovered by many other people a long time ago, and is already all over the microwave-possessing part of the world anyway. I really have no idea. Anyway, here it is. How to poach an egg in the microwave. Obviously this only works if you have a microwave oven. I really don't know how common microwaves are outside my own country, so if you have no idea what I’m talking about, then disregard this recipe.


You’ll need:
-An egg (No need to leave it out of the fridge before-hand. Not like when you’re making cakes.)
-A microwave (No need to leave it out of the fridge before-hand either. Assuming you store your microwave in the refrigerator.)
-Bread (Assuming you wish to eat toast with your egg.)
-Toaster (Assuming you want your toast to be toasted, as opposed to raw.)
-Glad-wrap (also known as cling-wrap. The plasticky stuff that people use to wrap things. Like sandwiches, not presents. You know, this sort of thing:
)

-A knife and fork (Not the Murder-Weapon-Knife, or even the Kitchen-Chopping-Things-Knife. Just an ordinary Spreading-Butter-Knife will do.)
-A plate (Unless you want to save on washing up by eating off the bench. But I would not recommend this; very unhygienic.)
-A microwavable cup. (Do check that it’s microwavable. Best results will be if the base is round and about the same size as what a regular poached egg is. Something like this:
)

-Salt and pepper (Depending on taste, or how healthy you want to be.)
-Margarine/butter/table-spread/any other yellow or white stuff you spread on toast
-An adult’s supervision (It’s obligatory, I know.)

The rest is easy.
1. Put a slice of bread in the toaster. You may need to get the afore-mentioned adult to help you cut it if it hasn’t been cut yet.
2. Crack the egg into the cup. Make sure there’s no shell in the egg, you don’t want a crunchy poached egg.
3. Use the fork to prick the yolk. You’re not trying to mix it in, all that’s needed is a quick prick. There shouldn’t be any difference to the naked eye, but this will help prevent the yolk from...gulp...exploding.
4. Cover the top of the cup with the cling-wrap.
5. Possibly the most important step: use that ever handy fork to prick holes in the glad wrap. Probably about three good pokes around the centre of the glad-wrap (but only little holes, don't let them join up to make big holes).


Nope, I haven't put two eggs in (although you can do that if you want). I somehow managed to get a double-yolker egg when I took that photo (that's an egg with two yolks in it if you didn't know).
6. Start the toaster. (The idea here is to try and sync things up so the toast finishes cooking at the same time as the egg does; but this’ll really depend on your toaster and microwave.)
7. Put the cup with the egg in it into the microwave, and cook it for 10 seconds on High (which should be the default setting anyway).
8. This is where things get a little challenging. You want the egg white to cook through, but ideally you want the yolk to still be a little bit runny. After 10 seconds, take the cup out, inspect, and give it a little swirl to make sure it’s cooking evenly. It’ll probably need a little longer. So, put it in for another 10 seconds or so, and continue this procedure until the white looks mostly solid.


9. If you hear a “bang,” there are two things you need to do.
    (a.)  Don’t panic. There’s nothing the matter. All that’s happened is the yolk has exploded. That’s why you put the cling wrap on top of the cup. It just means that your egg won’t quite be cooked as it should, with the yolk a little too crumbly, instead of runny. It’s still definitely edible, and quite tasty. Just blame your adult supervisor for it not being perfect. And stop it earlier next time.
    (b.)  Stop the microwave straight away, and take out the egg.
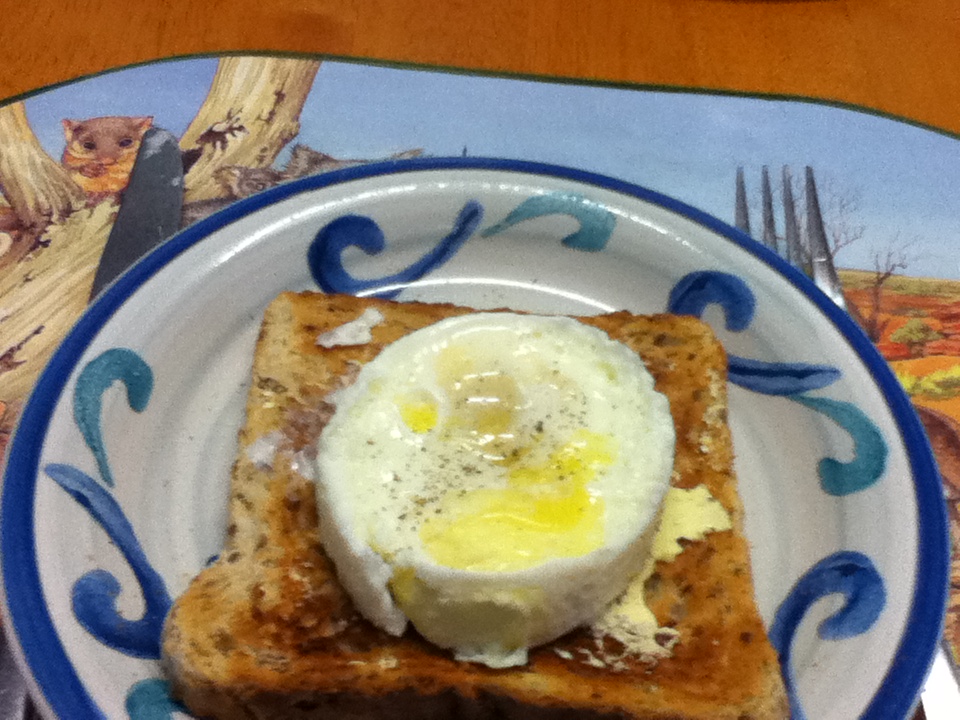
10. Use the knife to spread the spready stuff onto the toast once it’s cooked, and then use the knife to go round the egg in the cup so it tips out easily onto your toast. Put salt and pepper over the egg if you wish, and then enjoy eating your egg with that ever useful knife and fork.


Wow. That seems rather complicated. It isn’t. Getting the egg cooked just right may take a few attempts, but it’s certainly easier than the traditional poaching method. And there’s far less dishes as well. Just a plate, a cup, a knife, and a fork. Try it. At the very least you’ll be able to tell your friends about how you’re now officially a poacher.

Tuesday, 29 May 2012

Room Makeovers

Do you hate how your room looks? I do. Mine is cluttered with toys that I haven't gave away yet, coloring books, Barbie dolls, old clothes and a lot more! If you were to give your room a makeover, how would you do it?

Start with your old stuff, like what I mentioned above. Donate them to the unfortunate kids out there or have a garage sale! You could even keep some of your stuffed toys or your action figures, build a shelf and put them on top in a line. To fill the empty spaces of your old stuff, you could place all the stuff in your room that makes it cluttered on it, like the stuff that you just leave lying on the floor.
Now that your old stuff are out of the way, what should you do with your books? Or your movies? Or your CDs? You could build a shelf (you just need a plank of wood, those frames to keep it up and a few nails, but even if it sounds easy to buy and make, I don't guarantee it would be cheap. Usually is) and stack them there. Arrange them by kind, author, color, alphabetically, height, width, or just stack them there in no particular order! You could also place these stuff where your old stuff were, like what I mentioned earlier.
We should start with your desk next (if you have one). It's always important to keep your desk clean so that you could study there (studying in your bed makes it messy, and when you're done doing your homework, you're probably too lazy to pack them up so you just shove it all to the floor). If you study on your desk, you tend to study more neatly and properly (if you don't, try) and if you're done doing your homework and you're too lazy to pack up, just leave it there and pack it the next day. But you should at least make an effort to clean up.
And my favorite part of room makeovers is...badum tss your wall. Bring out all your Tigerbeat magazines, pull out the posters and stick them to your wall! Haha. Here is how my wall looks like (maybe you could get some ideas, hmmm?):


I love shopping, and whenever I snip off all those price tags from my clothes, I keep the brand tags and tape them to my wall. It mostly consists of Forever 21, Candie's and Artwork.


These are all some (I repeat: some) of my posters in my room. The picture in the middle of my door is a picture of Mikee and I when we graduated from photography classes.


The mainstream thing now on walls are usually quotes and song lyrics, but I placed a Bible quote. (I didn't cut out all of the letters individually because I was too lazy) I placed some of my pictures of me and my friends under it.
"Sorrow is better than laughter because when the face is sad, the heart grows wiser." -Ecclesiastes 7:3

I hope these helped in making your future room! :-)

Monday, 21 May 2012

CISV

Mikee & I at the Merlion
in Singapore
Hey guys, this is Lianna! I've been gone for sooooo loooong. Why? Well, first, I had no idea what to post. Second, I went to Singapore with my family to celebrate my Lolo/grandfather's & Mikee's mom's birthday and Mothers' Day. Third, I went to summer camp! I would make a review about a Singapore, but I'll probably do that tomorrow or later. Now, I'm gonna write some sort of review about this summer camp I went to for five days. It is soooooo fun.

Okay, let's get to this review. This summer camp is called CISV which stands for Chilren's International Summer Village. It's this summer camp all over the world and it's not your typical summer camp. It was founded by Dr. Doris Allen after World War II. A lot of people were focusing on initiatives to build and maintain peace, and Dr. Allen said that "we must start with the children."
And CISV was born. In 1951, delegates from eight countries gathered in Cincinnati, USA for the first CISV. Over the decades, CISV grew.
Over 50 years after the first village, CISV is still here. There is CISV in more than 60 countries and more than 190,000 people have joined.

CISV focuses on providing opportunities for individuals to respect other people's differences and cultures. The programs they have are:

  1. Village - Village is a program for 11 year olds wherein they will be attending a summer camp in another country with other kids in CISV. They will stay there for 28 days/four weeks and each delegation will be compromised of 2 girls, 2 boys and an adult leader (21+ years old). The international camp is coordinated by the adult staff and Junior Counselors (16-17 year olds). "Delegates to this multilingual and multicultural experience participate in a mix of educational, cultural and sporting activities, which emphasise cooperative global and intercultural living."
  2. Interchange - Interchange is a program for 12-15 year olds. It takes 14-28 days per phase. The delegations come from two countries and compromise 6-12 kids accompanied by an adult leader (21+ years old). "Interchange encourages a deeper encounter between two cultures by placing young people within families. Group activities such as a mini-camp are vital in complementing the intense in-depth family experience.  Interchange takes place in two phases with one delegation visiting another country and then reciprocating by hosting the delegation from the country they visited."
  3. Summer Camp - Summer Camp is for 14-15 year olds which happens for 23 days. Delegations come from 6 or 9 countries and are comprised of 4 - 6 youths, equally divided between girls and boys, who are accompanied by an adult Leader (age 21+).  The camp is coordinated by an adult staff. "Aimed at young teens, the Summer Camp encourages participants to take responsibility for leadership and programme planning. Each camp focuses on a specific educational theme. Participants work together to plan activities and discussions which build on the chosen theme."
  4. Seminar Camp - Seminar Camp is for 17-18 year olds which happens for 21 days. There are 30 participants plus international adult staff. " This personally challenging, intensive programme is facilitated by participants.  Participants develop their own themes and agenda to explore issues and form opinions about individual, international and multicultural matters, within a framework which stresses positive conflict resolution.  Seminar Camp fosters interest in the world as a whole and develops a sense of responsibility for its peaceful survival."
  5. Youth Meeting - Youth Meeting is for 12-19+ year olds which happens for 8 or 15 days. There are approximately 25 - 35 participants plus staff.  People under 16 travel in delegations with an adult leader. "The short regional camps feature individual themes that allow young people to explore intercultural issues in a regional context. The programme reinforces core CISV values, builds leadership and organizational skills, while promoting continued CISV involvement."
  6. International People's Project - International People's Project is for 19+ year olds which happens for 14-23 days. There are approximately 25 participants including staff. "This innovative programme is a way to learn while actively contributing to the community. In partnership with local organizations, delegates participate in hands-on work involving a specific theme or project, such as nature conservation or immigration. They also research the issue in their own countries and lead educational activities on the subject. Additional training may be provided by the partner or other experts in the field."
  7. Mosaic - Mosaic is a program for all ages. There are no limits to the participants and it happens for up to a year! "Mosaic is a project based programme which empowers individuals and chapters to be agents of change, reach out, and involve as many people as possible. Each project is a separate CISV experience that relates to a local need and interest and involves a different target group. It does not have to be in a camp setting, as with many CISV programmes, but is designed according to the needs and abilities of the CISV chapter. Using the three phase educational approach of discover, understand and create, local members develop projects in conjunction with like minded organizations or community groups. The aim is to create an authentic learning experience for participants and deliver a benefit to the wider community."
  8. Junior Branch - Junior Branch is the summer camp I went to. It is for 11-25 year olds, but it may vary from country to country. The camp I attended was for 9-11 year olds. "The very heart and soul of CISV, Junior Branch comprises young local CISVers between the ages of 11 - 25, who develop intercultural and leadership skills through educational and social activities.  Juniors manage their own activities and take an active role in the administrative responsibilities of their chapters.  Operating through a network at the national and international level, Juniors organize their own programmes on a wide variety of themes, such as social justice and the environment.  Junior Branch activities are aimed at building community, developing skills and promoting peace through education."
Like I said, CISV is not your typical summer camp. Each camp has a special theme and all the stuff that happens in it are related to it. The games and activities you have really fun, even if the theme is obvious or not. You really get to learn something about it.
The name of my camp was Camp Uhaw (Camp Thirsty), which meant it was about water. At first, I thought we weren't going to drink anything or not swim! It turned out, we actually did. We just learned how to use it very wisely. On the second to the last day, we had the "Thirst Games" which was something like the Hunger Games and we were divided into four tribes. My tribe was leading at first but then we got last place, so it was quite hilarious. They also have name games & getting to know games on the first day, and it's really fun.

To all of you who are looking for a summer camp, you should try CISV. ☺ Visit their website at cisv.org

Sunday, 6 May 2012

Summer treat!

Summer's round and about and what do we mostly get from it? Boredom and heat!  So here's for those who find themselves wandering in their fridge every five minutes. May I present... tununuh: Homemade Ice Cream!


Milk's probably the main ingredient for your favorite cold dessert and with a pint of that, you're capable of making your ice cream with no machine needed. ;)
There are a few other ingredients too, of course but they're just probably stored in your pantries or found at the baking aisle of your supermarket, convenient store and drugstore. 


Okay, so here's what you'll be needing:

  • 1 tablespoon sugar 
  • 1/2 cup milk or half & half (Not technically Half & Half so your ordinary t-pack of milk'll do.)
  • 1/4 teaspoon vanilla 
  • 6 tablespoons rock salt
  • 1 pint-size plastic food storage bag (e.g., Ziploc) 
  • 1 gallon-size plastic food storage bag
  • Ice cubes
After gathering those, you'll have to follow these five easy steps with, as most prefer, a guardian for safety.

  1. Fill the large bag half full of ice, and add the rock salt and then seal the bag.
  2. Put milk, vanilla, and sugar into the small bag, and seal it..
  3. Place the small bag inside the large one, and seal it again carefully. (Tip!: Make sure the small bag is sealed tightly so that the salt won't be ending up the flavor of your ice cream!)
  4. Shake until the mixture is ice cream, which takes about 5 minutes.
  5. Wipe off the top of the small bag, then open it carefully. Enjoy!
Aaaaaand, there you have it! Homemade ice cream done in less than ten minutes!


(c/o: Kaboose)